Class Description:
Recommended Supplies (Click on supply name for link to website where you can purchase):
sewing machine (unless you have reserved a borrowed machine)
gray, black, cream or white piecing thread (not Coats & Clark)
fabric from a quilt shop (not Joanns, Hancock, or Wal-Mart)
seam ripper

45 mm rotary cutter

24" x 36" rotary cutting mat

6" x 24" rotary cutter ruler
 12 1/2" square rotary cutter ruler


If You're Doing a T-Shirt Quilt-
Pellon 911FF Featherweight Fusible off the bolt at Joanns
If You're Transferring Photos:
Printed Treasures
or
Transfer Artist Paper
Quilt Shops:
Quilts Ole
Ann Silva's Sewing Center
Quilt Works
Quilts From the Heart
Southwest Decoratives


Embellishment:
Use fabric to create an heirloom commemorating a cherished loved one or a special event. Whether you are making a graduation present, showcasing your child’s elementary school photos, displaying a grandchild’s baby milestones, preparing a wedding gift, or making a father’s day present, you will gain the skills necessary to complete an original work of art. Explore photo transfer, block design, piecing techniques, fabric stamping, embellishment, and the basics of quilt construction. This course is suitable for anyone with basic sewing skills. A limited supply of sewing machines is available for use free-of-charge at Ann Silva’s.
Recommended Supplies (Click on supply name for link to website where you can purchase):
sewing machine (unless you have reserved a borrowed machine)
gray, black, cream or white piecing thread (not Coats & Clark)
fabric from a quilt shop (not Joanns, Hancock, or Wal-Mart)
seam ripper
45 mm rotary cutter
24" x 36" rotary cutting mat
6" x 24" rotary cutter ruler

Safety Pins & a Kwik Klip or 505 Spray Adhesive


Machingers Gloves or two rectangular pieces of vinyl shelf liner to help grip the quilt while quilting
Pellon 911FF Featherweight Fusible off the bolt at Joanns
If You're Transferring Photos:
Printed Treasures
or
Transfer Artist Paper
Quilt Shops:
Quilts Ole
Ann Silva's Sewing Center
Quilt Works
Quilts From the Heart
Southwest Decoratives
Handouts:
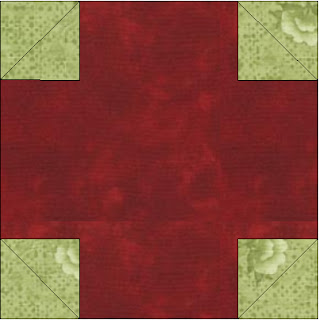
Layout Options:
The following are examples of the many blocks which can be used to showcase your photos. The white portion is where your photo could be placed.


Review (Click on the name for an online tutorial):
Piecing:
Stitch & Flip Triangles:

Applique:


Draw a diagonal line on the wrong side of each smaller square. Place right-sides-together, and lay one square in each corner with the line going from the raw edge to the raw edge of the larger square. Stitch on the lines. Press toward the corners of the larger square. Cut off the lower two layers using a 1/4" seam allowance to reduce bulk.


Clear Thread with Zig-Zag Stitch:
1.Obtain a reverse copy of the shape you wish to applique at a copy shop, or by flipping the pattern over and tracing the shape using a light box or window. Trace your reversed shape onto paper-backed fusible using a mechanical pencil. If using Steam-a-Seam II Lite, draw on the side more prone to stick to the fusible material sandwiched between the two layers of release paper. Keep both papers attached to the fusible while tracing. Bubble cut around your shape.
2. Remove the release paper without pencil markings. Make sure the fusible webbing stays with the release paper containing your traced shapes. Iron the fusible onto THE WRONG SIDE of the fabric specified.
3. Cut the shapes out on the pencil line.
4. Remove the paper backing and lay your shape where you want it to go on the background fabric.
5. Cover with an applique pressing sheet or parchment paper.
6. Iron your shape down permanently.
7. Place stabilizer on the wrong side of the background fabric. First, test your zig zag stitch on scrap fabric backed with stabilizer to make sure the bobbin thread is not pulling through the top and it is a size you want. I use stitch width 1.8 and stitch length .9, a Schmetz 60/8 microtex sharp needle, and neutral cotton thread for the bobbin.
8. Then, sew around each separate piece by doing a small zig-zag stitch. Use invisible thread for the top thread and a neutral cotton thread in the bobbin. You may need to adjust your thread tension to make sure the bobbin thread is not pulling through to the top. Every other stitch should be on the shape; every other should be on the background fabric.


9. Remove your stabilizer.
Tips & Tricks:
- Avoid tracing by copying your pattern pieces to full page label paper. Bubble-cut around the shapes.
- Parchment paper can be cleaned with a dry scratchy sponge and reused.
- If using Wash-n-Gone as your stabilizer, DO NOT USE STEAM.
- Be careful not to iron fusible to the right side of your fabric or your ironing board cover.
- Do not cut out fusible shapes directly on the line until they have been attached to fabric.
- Remove fusible from your iron with a dryer sheet.
- Do not embellish with 3-D elements until after your quilt has been quilted.
- Do not use clear thread in the bobbin.
- Set a light-colored background or pieces over your pattern to guide your placement of proceeding pieces.
Satin Stitch:
Use a thread that matches the piece to be appliqued and a zig-sag stitch. I used stitch length .4 and width 2.4. For smaller pieces, use a smaller width. For larger pieces, use a wider stitch width. The stitch should pierce the fabric on the background just outside the piece, then on the piece, then just off the piece, and so on. This method of applique is good for designs with a limited number of pieces. It is suitable for high-utility projects that will be washed frequently. This style may require many separate colors of thread and accentuates the edges of each piece.

Blanket Stitch:
Use a buttonhole stitch. I set my length at 2.7 and width at 3.1. For a country feel, use black thread. Otherwise, use thread that matches the color of each piece.The stitch that goes to the left should extend into the piece and the stitch that moves forward should be on the background alongside the piece.

Freezer Paper Method:
Iron freezer paper with the waxy side down. Then place another sheet on top and iron again. This keeps shrinkage from distorting the pattern. Trace the reverse image of the shape you want to applique. Cut it out and iron on the wrong side of fabric. Cut 1/4" around the shape. Use a paint brush to apply starch to a small section of the exposed fabric at a time. Press the fabric over the freezer paper.


Pull out the freezer paper.

Stitch the shape onto your background by hand.

Hot Ribbon:
Hot ribbon can be ironed around the raw edge of fabric to avoid the need to hold a shape down with stitching.
If you want to fill in areas with color, use a fabric marker.

If you want to write on fabric, use a fabric gel pen.

If you want a very fine line, use a pigment ink pen.

Pigment ink and stamps can be used to decorate fabric.
"Dress It Up" buttons can be found in the scrap booking section of Joanns and feature a variety of themes.
Acrylic paint can be used to decorate fabric. To give the fabric a less stiff feel, use textile medium in the ratio mentioned on the bottle.
Try adding sequins or beads for additional embellishment.
Finishing:
Click here for a tutorial about free-motion quilting.
Click here for a useful video on binding your quilt.
Click here for a tutorial on binding your quilt.
Inspiration:
http://www.polkadotchair.com/2012/08/photo-quilt-a-mini-tutorial.html/?cm_mmc=Email-_-11%2f29%2f12%20Xmas%20Gifts-_-main%20banner-_-photo%20quilt
Student Work:
Kristy Ott Meyer

Dara Zarafran

Nina Kay Stephenson

Anita

Fran

Fran

No comments:
Post a Comment