
Blocks:


Student Samples Made by Charlotte Levine:


Applique Steps:
1. Cut out a 13" x 13" square of your background fabric.
Trace at least one of each different shape onto paper-backed fusible using a mechanical pencil. If using Steam-a-Seam II Lite, draw on the side more prone to stick to the fusible material sandwiched between the two layers of release paper. Keep both papers attached to the fusible while tracing. Cut into separate sections based on the color fabric stated next to the shapes.
2. Remove the release paper without pencil markings. Make sure the fusible webbing stays with the release paper containing your traced shapes. Iron the fusible onto THE WRONG SIDE of the fabric specified. Add enough fusible to the fabric to cut the specified number of shapes.


3. Cut the shapes out on the pencil line.

4. Lay your pieces where they go on the reverse image of your pattern (The writing is backwards.) covered with an applique pressing sheet or parchment paper.

5. Peel off the paper backing just before you place each piece onto another piece. Lower numbered pieces go beneath higher numbered pieces. Your pieces should stick to each other without fusing. FUSING MAKES YOUR PLACEMENT PERMANENT.
6. When you have placed all the pieces on the background square, and are happy with your arrangement, iron it down permanently.
7. Place stabilizer on the wrong side of the background fabric (underneath your block). First, test your zig zag stitch on scrap fabric backed with stabilizer to make sure the bobbin thread is not pulling through the top and it is a size you want. I use stitch width 1.8 and stitch length .9, a Schmetz 60/8 microtex sharp needle, and cream cotton thread for the bobbin.
8. Then, sew around each separate piece by doing a small zig-zag stitch. Use invisible thread for the top thread and a neutral cotton thread in the bobbin. You may need to adjust your thread tension to make sure the bobbin thread is not pulling through to the top. Every other stitch should be on the shape; every other should be on the background fabric.


9. Remove your stabilizer.
10. Square your block to 12 1/2" with a 12 1/2" ruler.
Tips & Tricks:
- Avoid tracing by copying your template pieces to full page label paper. Bubble-cut around the shapes. Place them on the paper of your fusible with enough room to cut the specified number of each. Print this sheet for Blocks #1 & #2. The two unlabeled rose pieces should be dark red.


- Parchment paper can be cleaned with a dry scratchy sponge and reused.
- To make multiple identical and mirror-image shapes, trace one, fold your fabric (with fusible ironed on) to make the intended number, and cut while it is still folded.


- If using Wash-n-Gone as your stabilizer, DO NOT USE STEAM.
- Be careful not to iron fusible to the right side of your fabric or your ironing board cover.
- Do not cut out fusible shapes until they have been attached to fabric.
- Remove fusible from your iron with a dryer sheet.
- Use a Frixion pen to mark a 12" square on your 13" background squares to make sure you do not fuse any pieces outside of the part that will be showing after your blocks are sewn together.

- Do not embellish with 3-D elements until after your quilt has been quilted.
- Do not use clear thread in the bobbin.
- Use pinking shears or a 45 mm Olfa rotary cutter with a pinking blade to cut zigzag parts of applique pieces.
- Set a light-colored background or pieces over your pattern to guide your placement of proceeding pieces.


Background:
Atom Block:
Huning Castle Fountain Block:
Blocks 3 and 4:
Trace the ring onto fusible paper.

Cut it out.

Fold the shape in half to begin cutting the inner portion of the ring.

Save the inner circle for future blocks.

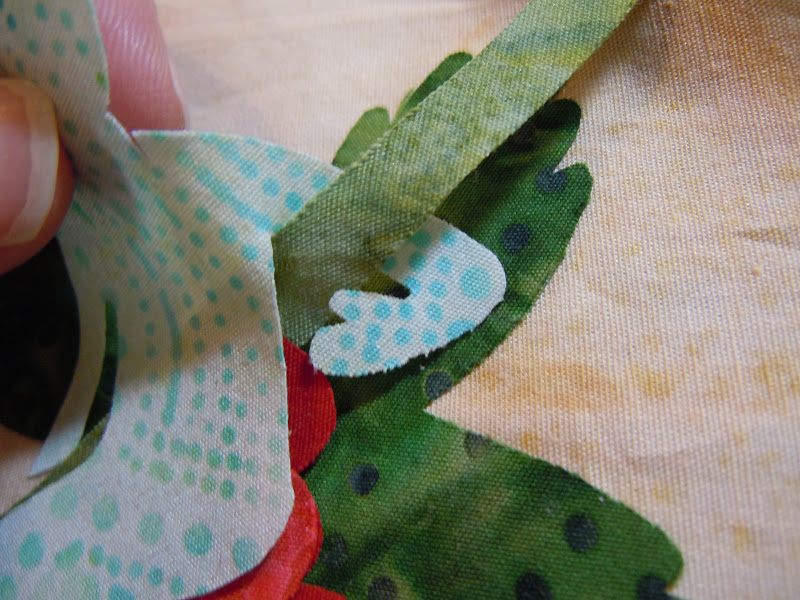
Remove the paper from the ring for placement on the background. Handling the ring stretches it out. If it becomes too large, cut a snip in a place where a flower will cover it, and overlap the ring.


Placing light-colored applique pieces on top of darker ones can cause shadowing. To prevent this, use a double layer of the light color. Iron fusible to another piece of the same color fabric that is slightly larger. Remove the paper from the larger piece. Before cutting out your applique pieces, fuse the fabric (with paper still attached and drawn applique shapes) to the fusible side of the larger piece. Make sure you cover it with release paper so you don't get fusible on your iron.


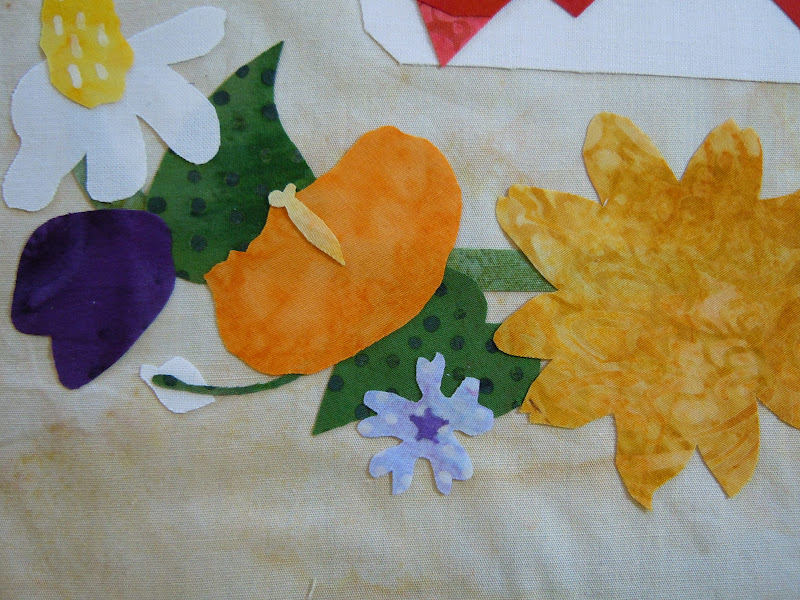
Make four periwinkles.


Cut the centers of the periwinkles by alternating aiming the tip of the scissors right and left. Fold each of the yellow shapes in half and cut a ^ slit to make the opening in the center. Do this before cutting the jagged oval so you have something more substantial to hold. Once the centers are cut out, cut out the small yellow shape.

Alternatively, you might want to use a yellow fabric marker or textile paint. DO NOT USE PERMANENT MARKER! These bleed when they come into contact with water. If you just want a single color of marker or paint, rather than an entire set, Joann Fabrics has these available. I believe the markers are Markal.
Make four tulips.

To check the placement of smaller parts, place them fusible side up on the pattern outline. Lay the right side (without fusible) of the larger piece over the top, aligning with the outline.


If you cut two at once when creating your applique pieces, you should have two flowers that are mirror images of each other.

Make four sets of leaves, but remember not to fuse them down yet.

Position your tulips under the petals.

Peel the paper from your periwinkles and place them evenly spaced between the tulips on the ring. They may not align exactly with the pattern, as some may be mirror image versions.

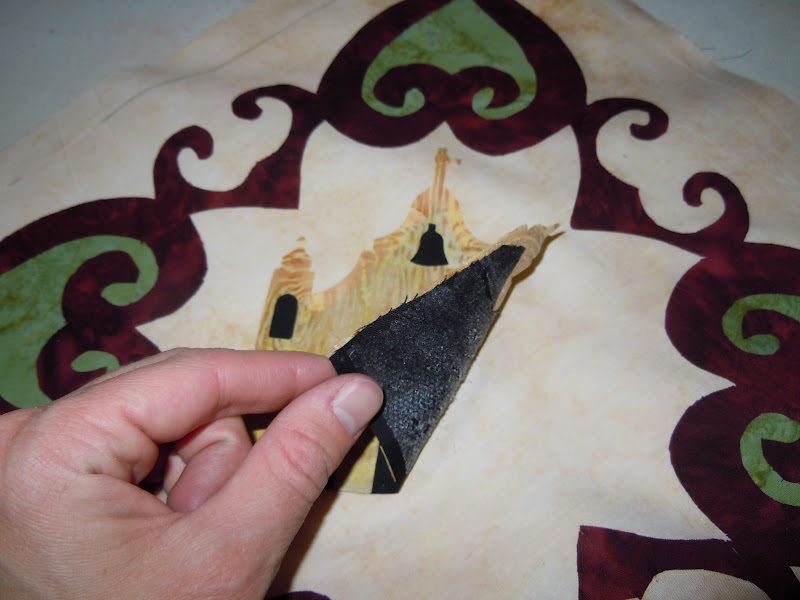
The heart outline portion of the mission block can be cut by folding the fabric prepared with fusible in quarters. It is important that the fabric does not shuffle during this process. Alternatively, the design can be cut out with an Xact-o knife. Do not fold the design if using this method. Carefully cut out the design with the paper side up and a cutting mat underneath. Flip your mat to the back side so you do not get gouges in the top of your mat.


Place the green hearts behind the burgundy heart outlines.

Place the black fabric behind the mission with the fusible side down.
Blocks 5 & 6:

Exterior of Castle Huning with Franz Huning standing in front, circa 1880 - 1890. From the portfolio "The Huning Castle, A Photographic Portfolio" by Walter Haussaman. 1954.
Franz Huning built his famous two million dollar “Castle” in 1883 in Albuquerque. It fell into disrepair
and was torn down in the 1950s.

The Huning Castle Apartments are located at 1500 Central Ave SW, Albuquerque, NM. The original fountain still remains.
The flowers featured this month are blanketflower, santolina and ornamental onion.


To help you center your fleur-de-lis and fountain applique pieces on your Huning Castle Fountain block, fold your block in half on the diagonals and press.

There are several places on your pattern where you see an icon of a marker. This indicates use of a fabric marker, rather than separate pieces. I used a gray Fabrico marker.

I conducted a comparison of the different types of markers, as shown. I heat-set them and washed the entire sample in hot water. The gray Marvy fabric marker with a brush tip (available singularly at Joanns) was fairly light. A black Marvy fabric marker is also available. The gray Fabrico marker worked well. However, Fabrico markers are rather expensive. I've only seen them sold separately at large quilt shows. Sets of 6 are available online. (See "Recommended Supplies" below.) The Sharpie Stained markers with a brush tip spread more than the others on contact, which would not be good for fine lines or small details. The ultra fine line permanent Sharpie did fine in this instance, but I have previously experienced major bleeding during washing when using these markers, so I strongly discourage you! The Frixion pen ink disappears when ironed. I wanted to show you that they are not meant to be used as permanent fabric pens. A faint shadow may remain. Please consider this when using Frixion pens. Zig and Micron pens are good for making fine lines, but filling in a small shape is tedious and difficult. They can also bleed during application. Removing the paper backing may help alleviate this affect. Pentel Gel Rollers are fantastic, but only come in black and are best suited for writing and making lines. They are pens and are not the best choice for filling in anything but small shapes.

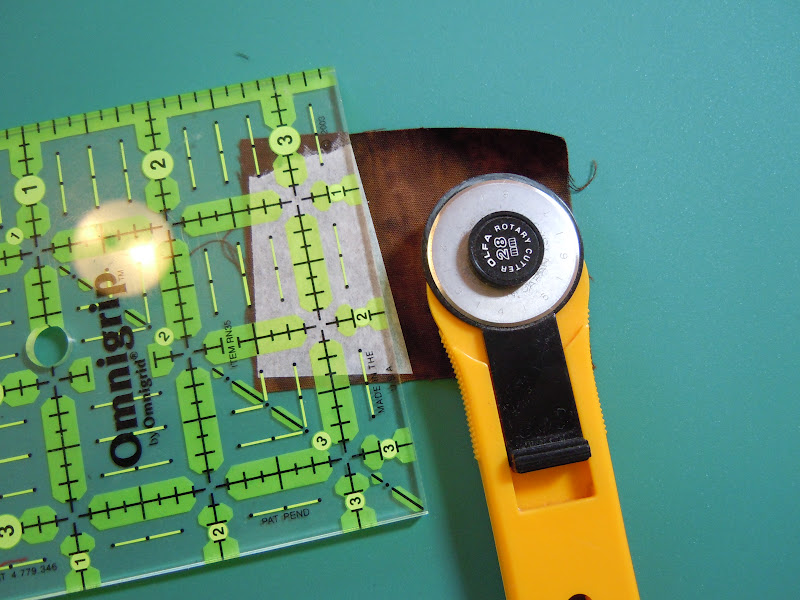
For the pieces of the fountain with a pinked edge, use a pinking blade on your rotary cutter or pinking shears. I prefer not to use my pinking shears, as paper is involved. When using decorative blades on your rotary cutter, turn your mat over so you don't get undesirable groves that interfere with cutting straight lines in the future. Check the rotary cutting tools area of the Joann's scrap booking section for 45 mm Fiskars decorative blades such as deckle, victorian, and pinking. These are compatible with Olfa 45 mm cutters. Olfa makes pinking, scallop, and wave decorative blades for 45 mm cutters. Do not buy Simplicity Rotary Cutting Machine blades. They will not work with your 45 mm rotary cutter. Cut the pinked edge before you cut the curved side so you have something to hold onto.


For the santolina, first cut out four yellow centers.

It is difficult to cut tight curves with a decorative blade. Therefore, use short, straight cuts as shown to make your way around the oval shapes. Keep turning the piece so you are constantly rolling the cutter directly away from you, rather than at an angle. A small rotating mat is useful for this.

Apply a piece of fusible large enough to easily fit four yellow santolina centers to the back of the burgundy fabric. Fuse the yellow centers to the fabric with at least a 1/2" between each piece.

Cut around each center with a rotary cutter that has a deckle blade. Leave about 1/8" around the yellow center.

For the center piece of the blanketflower, fold the piece in half to cut out the center. It is easier to cut out the center while there is more to hold onto.

Then, use a rotary cutter with a deckle blade to cut around the outer circle.

Blocks 7 & 8:

Photo by Tony Manning.


For history of the St. Francis Cathedral, check out http://www.cbsfa.org/history_of_the_cathedral_basilica1.aspx.

For history and photographs of the Alvarado Hotel, check out http://www.wheelsmuseum.org/alvaradohotel.htm and http://harvey.library.arizona.edu/finding_aid/7nm/welcome.html.
To create the center window of St. Francis, I recommend using a Pentel Fabric Gel Pen. After applying fusible to your gold church piece and cutting it out, remove the release paper to make the piece more transparent. Place your pattern on a glass table lit with a lamp underneath or a light box. If neither is available, use masking tape to affix your pattern to a window; then, tape your gold church piece onto the window, aligned with its outline. Use the gel pen to outline the shapes and make the small dots. If you are working on a window, move to a table after this step. Now, fill in the shapes using the gel pen.

Fabric marker is suitable for filling in larger shapes, but more difficult to control during application, due to its broader tip and tendency to spread with pressure. I do not recommend using a fine line pigment pen, such as Micron, because shading in a space will be overly tedious and Micron pens have a tendency to bleed upon application. Removing the release paper from the shape before using the pen might help. I also do not recommend using Pigma Brush pens, as they bleed heavily upon application, making it hard to achieve a distinct edge to your shape.
Another method of creating shapes without using applique is using Paintstiks. If you would like to try this method, I recommend buying extra fabric or practicing on a scrap piece first. First prepare the background fabric piece (the gold Alvarado hotel piece) by applying paper-backed fusible, and cutting it out. Iron a piece of freezer paper larger than your background piece with the waxy side down. Peel it off your ironing board. Pre-ironing it allows it to shrink before you trace your pattern rather than after. Lay it on your pattern and trace the outline of the background fabric piece with a pencil. Trace around the shapes you would like to use Paintstik to apply (the Alvarado letters and the small windows). Cut out the main shape with scissors. Place the freezer paper on the wrong side of a cutting mat. Carefully, use an Exact-O knife to cut out the smaller shapes. It is easier to make several downward strokes instead of attempting to cut a shape out completely using a continuous line. Do not disconnect the centers of letters. Iron the freezer paper stencil to the front/right side of your building piece. There will be fusible on one side of the fabric and freezer paper on the opposite side. Press by lifting the iron straight up and down. Do not rub the iron along the freezer paper or you will catch an edge and the paint will go underneath the shape. Take your black/asphalt Paintstik and remove the hardened skin covering the tip with an Exact-O knife. Clean off your knife with a paper towel. Rub some of the paintstik onto the waxy side of a small piece of freezer paper. Use a small stencil brush to pick up the paint. Apply the paint to the open parts of your fabric piece, exposed by the freezer paper. Do not directly apply the Paintstik, because the application will be overly heavy. The freezer paper can be removed carefully now or later. Let the piece dry for an entire day before heat setting it. Otherwise it will bleed out creating an undesirable halo affect. After the paint has dried, you can use a black fabric pen or marker to fill in any gaps in the lettering, as shown below.

Do all your painting, markering, and inking before you place additional pieces. This way, if you are not satisfied with the result, you do not have to remake multiple pieces. It also allows piece placements to be made with respect to the positioning of fine details and lettering. For future reference, wall stencils can also be used as a template instead of the freezer paper to make shapes on fabric.
To alleviate any confusion, portrayed below is the layering order for the St. Francis door. First, prepare the black window, brown door, and textured brown door frame. The frame goes over the door, covering the far right and left edges. The half-circle window lays on top of the door frame. The entire unit goes onto the gold church piece. If you have removed the paper backing, do not iron until you ready for permanent placement.


Blocks 9 & 10:
The tram block features poppies, crocuses, verbenas, zinnias, and mansas. Poppies symbolize consolation, and crocuses symbolize youthful gladness.
The balloon block features jessamine, torch lilies, columbines, and jujubebe.

Jessamine symbolizes friendliness; Torch lilies symbolize happiness.
For the history of ballooning in Albuquerque, click here.
Use a ruler to make the tram outline on your fusible paper. You may want to use an additional layer of white fabric backed with fusible to avoid shadowing.

For straighter lines, use a small rotary cutter and ruler to cut out the tram piece.

Use the reverse pattern copy to guide your placement of pieces going onto the tram piece.

Use a pigment ink pen and ruler to make the line separating the top of the tram from the sides.

The windows go on top of the tram piece. This avoids shadowing and cutting out inner curves.

The red decorations on the tram are placed in the order shown. First the light red piece is placed.

The red piece is placed next and covers the top portion of the light red piece.

The dark red piece is placed last and covers the top part of the red piece. Any portions of the red protruding from the side of the tram piece can be cut off prior to fusing.

Use purple fabric marker to make the detail on the verbena.

Apply opaque, white fabric paint to make the texture on the mansa. Use a brush with a skinny tip. Make short lines---applying lighter, then heavier pressure and lifting the brush from the fabric. You can paint the yellow rectangle of fabric you will be using for the mansa prior to cutting it out from the fusible paper, or paint after cutting out the shapes.

The following photos show some of the layer of the flowers in the tram block.


Here are the pieces you will need to prepare for the balloon block.

I used orange and red fabric markers to create the smaller details on the centers of the columbine and jessamine.

To create the flags, I drew and outline with black fabric marker. I drew a blue square in the top corner with fabric marker. Then, I made a red line on the far top and bottom using fabric marker. This helped guide my placement for the remaining red lines. Using the tip of a toothpick and opaque, white fabric paint, I applied tiny drops to the blue portion of the flag to serve as stars. Make more than the necessary number of flags so you can use your favorites. Apply fusible to the back of the flags you have selected for use. Then, cut them out on the outer black line.

It's your choice whether to use the die cut balloon or to use the pattern and white fabric. If you want a more modern balloon, you can use fabric markers to color it. For the historical balloon, I used a frixion pen and ruler to mark diagonal lines to be stitched by machine with black thread. Fuse the balloon to the block before making your Frixion lines, or it will disappear when you apply heat from the iron.

Place your pattern beneath the background fabric. Trace the figure in the basket with a gel pen for fabric. Do this before fusing on the basket so you won't get black ink on the basket and can cover the bottom edge. If you don't like how it looks, you can cover it over with the basket without having to redo the other parts of your block.

I used a small rotary cutter and ruler to make my balloon basket perfectly rectangular.

Block 11:
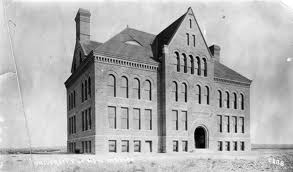
This month's block features Hodgin Hall at the University of New Mexico.
A Model:

Then:
Now:

The featured flowers are Mexican hat, penstemon, serbian bellflower, and wild grass.
If you previously fused a block in the standard position that should have been positioned in the on-point format, this is a block that can be placed on-point instead. Just rotate the text and building 1/8 of a rotation.
Prepare your pieces with fusible. You do not need to make the black shape, as we will be using fabric marker. If you prefer to create it with fabric, use scrap from another block. For the skinny, white rectangular strips on the top of the building (not retraced on the right hand side of the pattern), apply an unmarked piece of fusible large enough to fit the two rectangles to the white fabric, next to the piece for the steps. Measure the rectangles, and cut two identical rectangles from the open space on the fusible-backed white fabric using a rotary cutter ruler and small rotary cutter.

Cut out your pieces.

Use a gel roller for fabric or pigment pen to make your lines for the stairs and small flower details. Use a fabric marker for the other details shown.

Layer the pieces by removing the paper from the back of the upper pieces (with higher numbers) and placing them on top of the other pieces. For now, keep the paper on the back of the larger pieces so they do not accidentally get fused someplace unintentional. There is no need to fuse the pieces together yet. They will stick if you have used Steam-a-Seam II lite.

Lay your building pieces over the pattern that is the mirror version of the one you traced to make your shapes. Use this to guide the process of drawing windows with a black fabric marker. Trace the outside, and fill in the centers afterward.

Place your background over the non-reversed pattern. IF THE WRITING LOOKS BACKWARDS NOW, IT WILL BE BACKWARDS ON YOUR BLOCK! Lay your background fabric over the top. Trace the writing with a gel roller for fabric. A sunlit window or light box will greatly aid you in this process.

Tah-da!

Block 12:
Get your pieces ready.

Cut out your pieces.

Add details with paint, fabric markers and fabric gel pen.

Layer the pieces as shown.

Place parchment paper over the reverse pattern. Use it to guide your placement. You can fuse pieces together before fusing them to the background.

Use a 1" x 6" ruler and a Frixion pen to sketch out pine needles.

Use green variegated thread to create needles. Use a tight zip-zag stitch. I use a .3 stitch length. Begin on the branch.

Start with a wider width and gradually adjust down to 0.0. For longer needles, start with a wider width (3.3). For shorter needles, start with a smaller width (2.4).

This is what the back looks like. I use the same thread in the bobbin. Use a sturdy stabilizer such as tear-away.

The pen markings are to be used as a guide. there's nothing wrong with adjusting as you go.

Make some longer needles that cross over the others to give a dimensional look.


When you are satisfied with the result, iron to remove Frixion pen markings.
Block 13:
The plant featured in this block is skunkbush sumac.

Here's a look at the prepared pieces for this block. You will need to add fusible to the back of the newspaper. Remember to protect your iron and board with parchment paper or a teflon pressing sheet. This was printed on Printed-Treasures sheets. You put these through your printer. I set my ink flow and print quality to high to prevent a faded look. They are fairly pricey at about $2 per 8 1/2" by 11" sheet. Transfer Artist Paper creates a nice image at about $1.50 per sheet, but has a stiffer hand (feel to it).

You have two options for the spaceship: the die-cut or the applique pieces drawn on your pattern.

If you choose the die-cut, you could put a piece of scrap fabric behind the spaceship holes or allow the cream background to show through.


For the berries, I cut a small square, then free-formed a circle. It's best to cut larger and trim to a smaller size, if necessary. I placed these berries on the red outlines where I thought they looked best. I used two or three berries per cluster to add dimensionality.

Tuck your alien arm behind the vine before fusing anything down.
The leaf is on the very bottom. The berry cluster is above the vine.

A fabric marker with a fine tip or a gel roller for fabric can be used to draw in the alien's features.

For those of you who are using the reverse copy as an exact template, rather than a general guideline, you will need to draw out the outline for the pictured berry cluster.

Please make the following correction.


Block 14:
Mix textile medium with brown glitter. Apply a thin layer to the biscochito piece with a paintbrush.


The black pieces will be layered on the white basket piece. Remove the paper backing from the white piece's fusible and lay it on the reverse pattern to guide your placement.

Paint a piece of white fabric with pewter Lumiere paint by Jacquard. Use a pinking rotary cutter blade or pinking shears to cut the zig-zag portion.

Use a thick, black permanent marker to draw the milk bottle on the clear vinyl. Cut on the outside of the line so the shape will be visible within your block. Do not iron the vinyl. Apply heat to the pieces on top of the vinyl to hold it in place for applique.

Add details to the pecans and pumpkins using fabric markers.

Layer pieces as shown.

Use letter stamps and black pigment ink to label the pecan bag. Make sure your block is on-point.

Block 15:
This block requires four of each piece, excepting the green vine. They are all orientated the same direction, so you cannot simply fold the fabric to make multiples. To cut more than one of a shape at one time, cut all the shapes with the fusible paper-side-up.

These are the pieces you will need. Instead of attempting to cut out detailed shapes in a singular continuous line, make small clips in toward the center of a shape.

Layering for the smaller pieces is as shown. Do not remove the paper backing from the bottom piece until you are ready to place it in its final position on the background.

Before fusing down the vine, first tuck the four buds underneath.

Complete the block as shown.

Block 16:
Cut the pieces shown for the vase.

Remove the paper backing from the white piece, and lay it over the pattern. Apply the striped and black pieces. Remove from the pattern page. Fuse the pieces together inside two layers of parchment paper. Flip to the back and cut off any protruding black and striped pieces.

For the white flower, fold 1/8" white ribbon back and forth on tear-away stabilizer. Stitch over them, put the needle into down position, rotate the stabilizer 180 degrees, fold the ribbon the opposite direction and stitch over them again.

Continue until your flower looks like the photo below.

Flip the flower over to cut away any excess stabilizer.

Place your flower pieces as shown.

Add details with thread, paint and/or fabric markers.

I used the photographed supplies for creating details.

Block 17:
Put fusible on the entire back of these pieces and the black one.

A flour and water resist can be used to create texture on the mountain. Mix equal amounts of flour and water until there are no clumps. Using a fat brush, cover the entire right side of your lightest brown fabric. Let dry thoroughly. Crumple, bend, fold, and mash in your hands. Smooth out on a flat surface.

Paint over the entire flour-coated side using brown fabric paint. Allow to dry completely. Rinse away all the flour and dry. At this point, use the fabric as you would normally.


The resulting texture looks like the photo below. Darker fabrics make the paint appear darker.

The mountain shapes look like this when they are cut.

Use the pattern as a guide for layering the mountain pieces.

Lay the pieces on the black background to create a coloring book outline effect. Cut off the excess from the top leaving 1/8".

White fabric has been provided for the sword. I paint one side with pewter Lumiere. After this dries, I iron the fusible marked with a tracing of the sword to the unpainted side and cut it out.

Prepare your remaining pieces the usual way.


They will look like this when cut.

Begin layering as shown. Details on the armor are drawn with a gray fabric marker.

The woman's boots are cut from white fabric. Fabric markers are then used to create designs.

Keep layering. The people can be built on an applique pressing sheet or parchment paper.

Put a tear-away stabilizer behind the head. Lay several pieces of ribbon over the top portion of the heard. Sew in a straight line with a shorter stitch length and brown thread. Sew over each. With the needle down, lift the presser foot.

Add several more pieces of hair alongside each other. Stitch over them. Repeat the process until the entire head is covered. Reverse stitch back to the top and then stitch forward until the needle goes off the fabric. This secures the ribbon better. Remove the stabilizer.

Twist both sides of the hair. Use a ribbon to pull it into a pony tail.

Use a pinking blade on a rotary cutter or pinking shears to cut wavy lines on both shades of green. Do not shorten the length of the strips.


Fold over as shown and cut slits in the darker green fabric with pinking shears.

Remove the paper from the back of the darker green. Layer on top of the lighter green. Curvy-cut the blue fabric with a regular rotary cutter blade or scissors.

Free-cut tree trunks by cutting up, over, and down or diagonally up and diagonally down.

Cut Vs on the other side to complete the line of tree trunks.

When laying out your trees on your block, put some trunks in front of the river and some behind to add dimensionality.

The green portion of the trees covers the connected top portion of the tree trunks.

Lay two piece of fusible-backed fabric right-sides-together. Cut what appears to be octopus legs. Then cut a curve. If you cut the curve first, it is difficult to hold the shape while cutting. Remove the paper.

Lay one piece on top of the other as shown to create a bush.

Lay out the pieces as shown on a cream background. After everything has been placed as desired and stitched down, square to 18 1/2".
Pieced Background:
Please refer to the printed pattern instructions, as not all steps are shown.
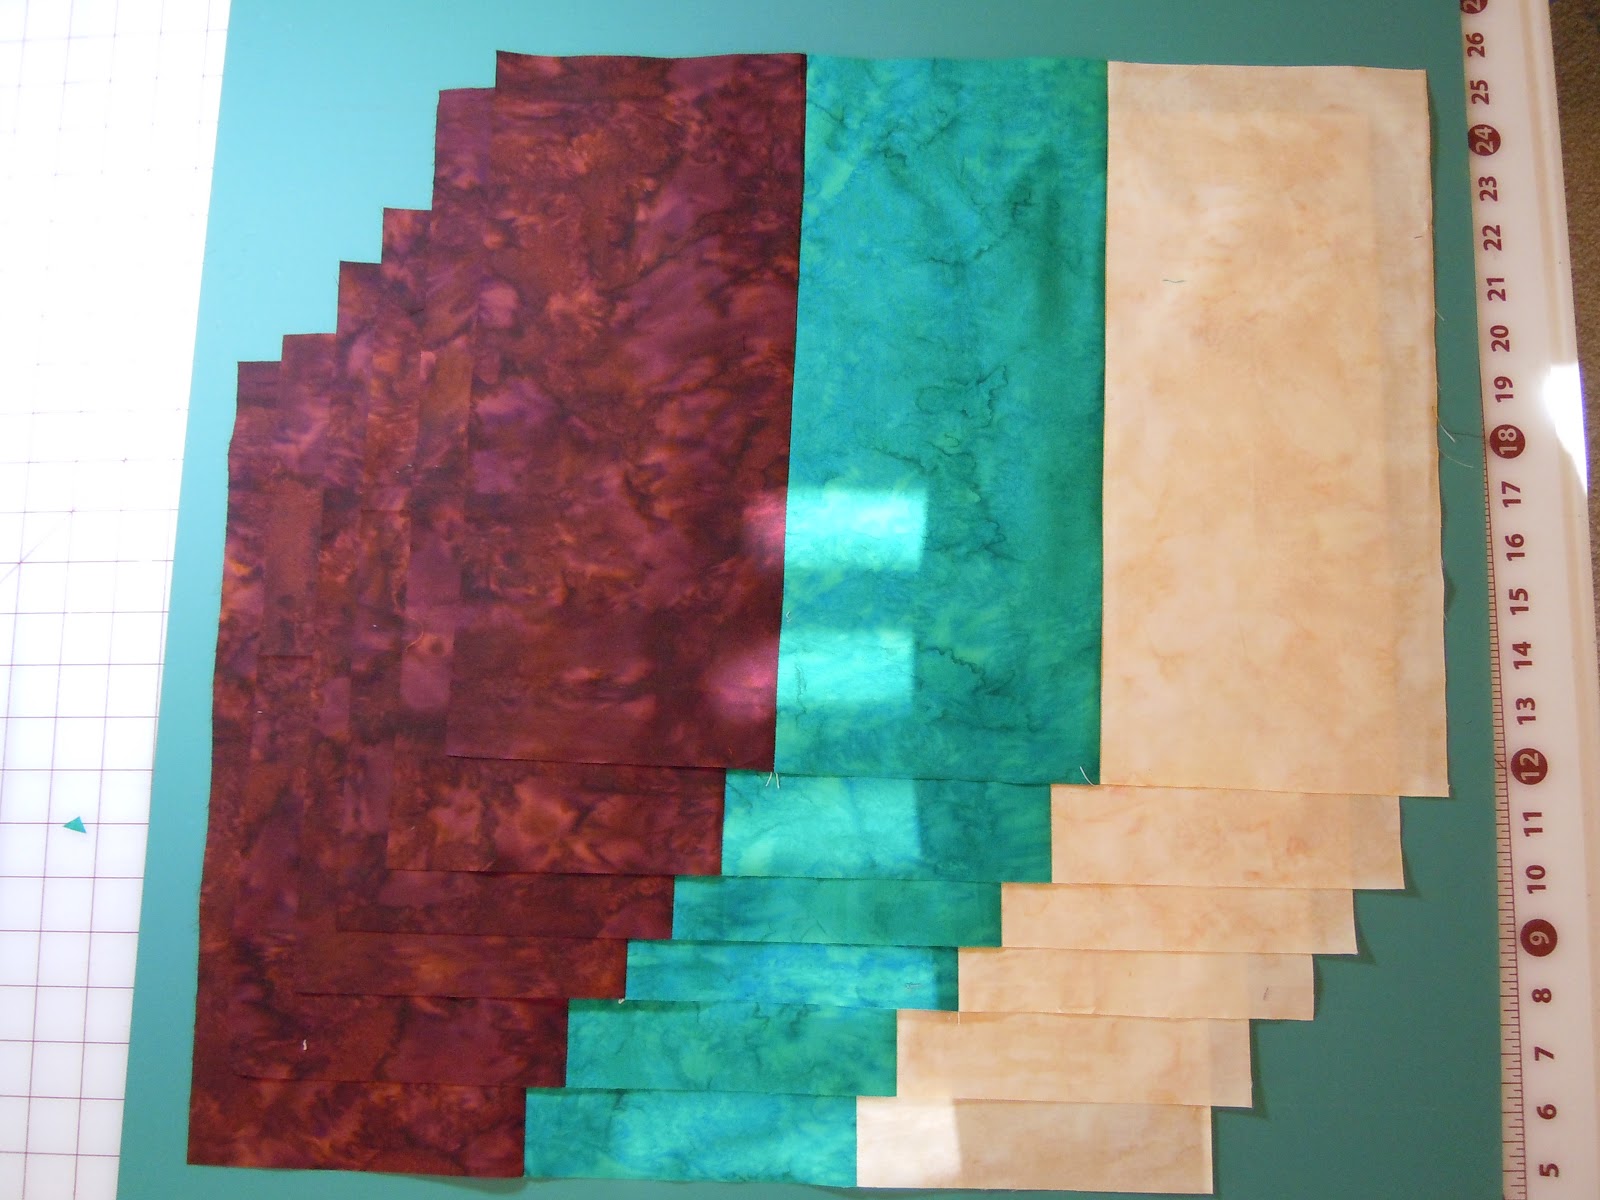
Strips Sets A, B and C
Make Strip Set A by attaching a 2” x 22” stone green strip to a 3½” x 22” tortilla strip to a 3½” x 22” stone green strip to a 3½” x 22” cayenne strip to a 2” x 22” tortilla strip. Make Strip Set B by attaching a 3½” x 43” stone green strip to a 3½” x 43” tortilla strip to a 3½” x 43” stone green strip to a 3½” x 43” cayenne strip. Make Strip Set C by attaching a 2” x 21½” cayenne strip to a 3½” x 21½” stone green strip to a 3½” x 21½” tortilla strip to a 3½” x 21½” stone green strip to a 2” x 21½” cayenne.

Strip Set A
Cross-cut into 8 2" sections
Cross-cut into 8 2" sections

Strip Set B

Strip Set B
Cross-cut into 16 2" sections.
Cross-cut into 16 2" sections.

Strip Set C

Strip Set C
Cross-cut in 8 2" sections.

Assemble four of each unit as shown (Strip Set A, Strip Set
B, Strip Set C, Strip Set B flipped 180 degrees & Strip Set B flipped 180
degrees, Strip Set C, Strip Set B, Strip Set A).

Begin sewing as shown.

Make four of each unit as shown.

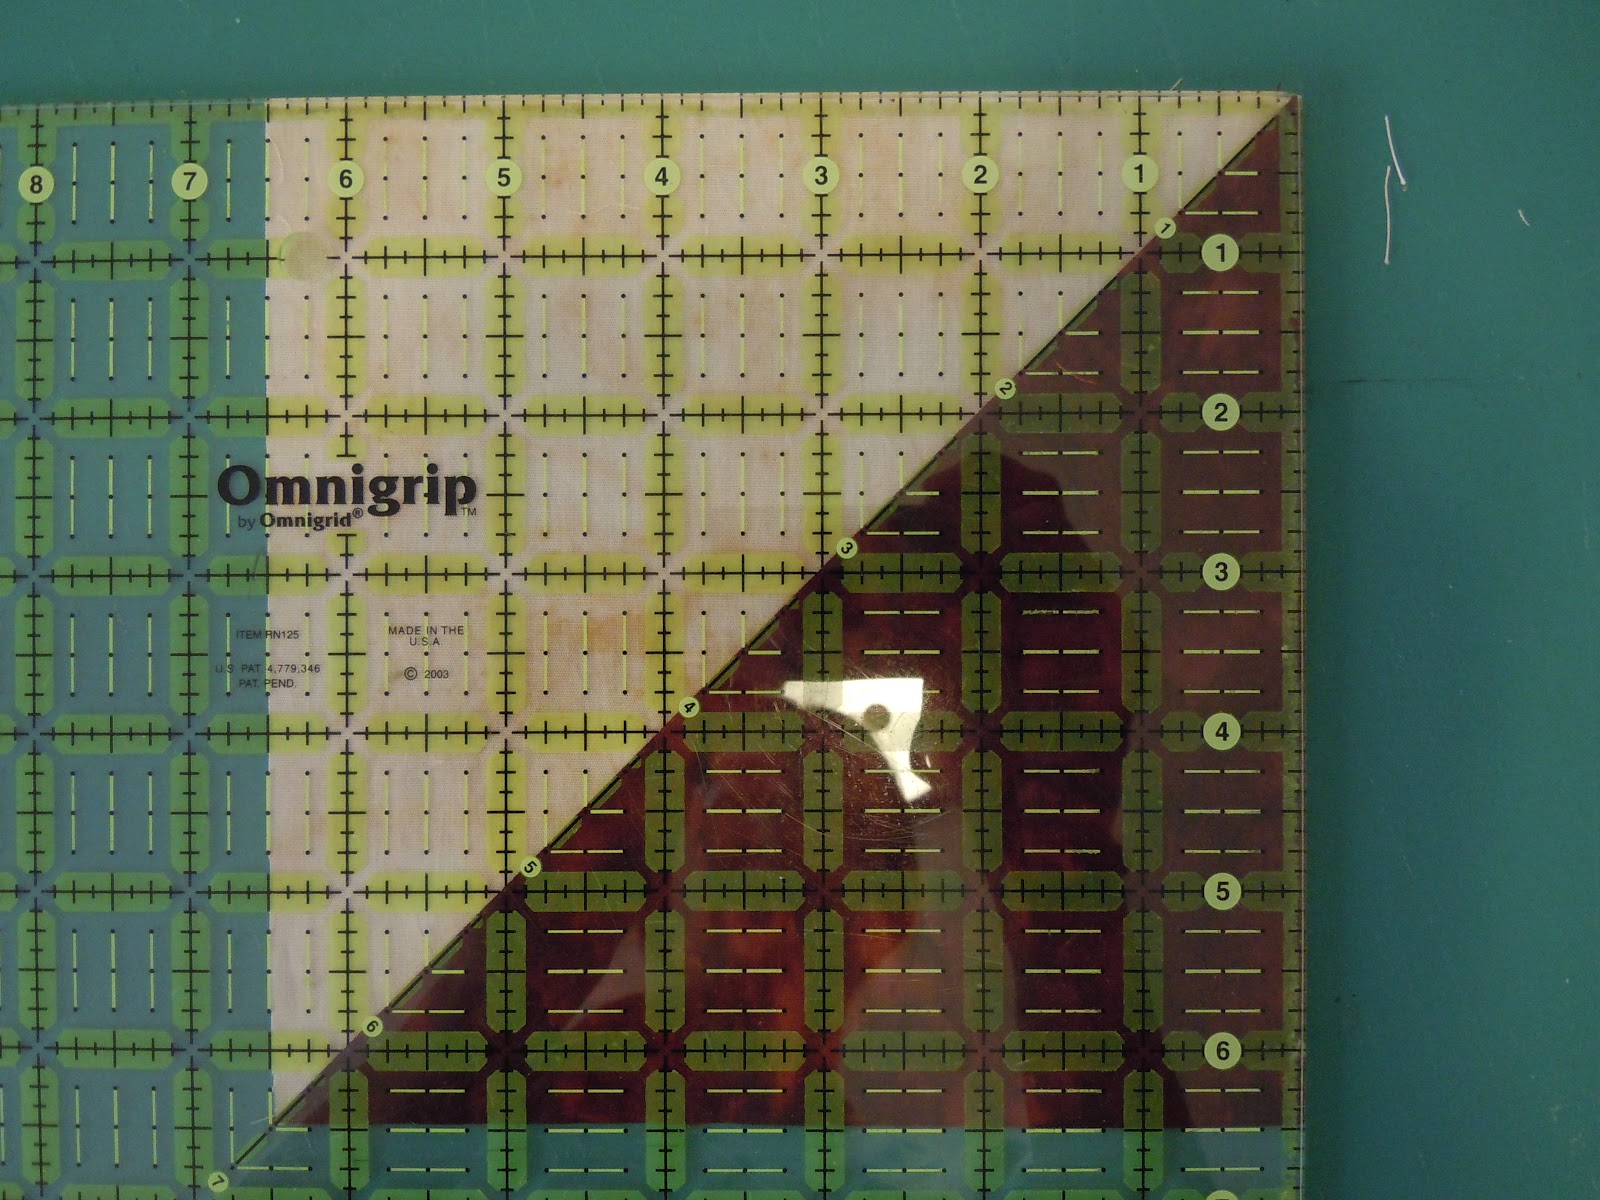
Make half square triangles by setting each of the sixteen
barbeque 7” squares on a tortilla 7” square, right-sides-together, and sewing
¼” from either side of the pencil line. Press to the barbeque.

Cut on the drawn line.

Square to 6 1/2" or your blocks will be too large.
Make half square triangles for the delectable mountains by
setting each of the twenty cayenne 4” squares on a tortilla 4” square,
right-sides-together, and sewing ¼” from either side of the pencil line. Chain piece your half square triangles as shown.

Press to the cayenne. Leave connected when pressing.

Cut on the drawn line.

Square to 3½”.

Sew each triangle made from half a 6 7/8” stone green square
to a 3½” x 9½” cayenne rectangle as shown.

Cut off the protruding portion of the cayenne rectangle to make a triangle (Triangle Unit).

Attach a 3½” x 12½” rectangle
to each Triangle Unit as shown.

Cut off the protruding portion of the cayenne rectangle to make a triangle.

Sew together the long sides of three 6½” tortilla strips with three 6½” stone green strips. Press. Cross-cut one into three 14½” sections.

Take two stone green/tortilla strips and attach a 6½”
barbeque strip to the stone green side. Press and crosscut into six 14½”
sections.
Cross-cut each unit into 4 3 1/2" sections.

Press each unit in half to
mark the midpoint. Pin before sewing Units A-H in alphabetical order as shown. Start at the midline and move outward. Sew four of the unit shown.

Alternative Applique Options:
Thread Play:
Make sure your feeddogs are down. Use a darning, embroidery, or free-motion foot and variegated thread to make designs that go on the surface and extend beyond the edges of fused pieces. I use the default stitch length and a straight stitch. This style of applique works best for art quilts that will not be washed. It is a good way to make separate applique pieces blend into a contiguous whole.

Satin Stitch:
Use a thread that matches the piece to be appliqued and a zig-sag stitch. I used stitch length .4 and width 2.4. For smaller pieces, use a smaller width. For larger pieces, use a wider stitch width. The stitch should pierce the fabric on the background just outside the piece, then on the piece, then just off the piece, and so on. This method of applique is good for designs with a limited number of pieces. It is suitable for high-utility projects that will be washed frequently. This style may require many separate colors of thread and accentuates the edges of each piece.

Blanket Stitch:
Use a buttonhole stitch. I set my length at 2.7 and width at 3.1. For a country feel, use black thread. Otherwise, use thread that matches the color of each piece.The stitch that goes to the left should extend into the piece and the stitch that moves forward should be on the background alongside the piece.

Iron freezer paper with the waxy side down. Then place another sheet on top and iron again. This keeps shrinkage from distorting the pattern. Trace the reverse image of the shape you want to applique. Cut it out and iron on the wrong side of fabric. Cut 1/4" around the shape. Use a paint brush to apply starch to a small section of the exposed fabric at a time. Press the fabric over the freezer paper.


Pull out the freezer paper.

Stitch the shape onto your background by hand.

If using Wonder Under, you can remove the paper backing after it has been fused to the wrong side of fabric, trace applique shapes onto release paper (paper after fusible has been removed) with permanent marker, and transfer the design outline to the fusible. Iron on the paper side with the marker side down on the fusible side of the fabric. Then, remove the paper. This will only work with light fabrics.

Personalizing Your Quilt:
You are welcome to make your version of the NM Centennial BOM quilt "your own" by personalizing it. To accomplish this:
1. Choose a topic for you new block.
2. Type in your topic at google.com. Click on the "Images" tab on the left-hand side underneath "Search" and "Everything". This will bring up only pictures. Choose an image you would like to use. Be careful to respect copyright laws. If you are going to sell your quilt or enter it into contests, you will need to use the image as a guide or inspiration unless you have permission to use it from the owner.
3. Print the picture. Tape an overhead transparency sheet over your photograph. Trace the major sections of color or value using a ultra fine line permanent marker. Other markers tend to smear.
4. Remove the transparency sheet. Flip it over and copy it. This will give you a reverse image for applique.
5. Write the corresponding colors on each pattern section using the picture as a guide.
Recommended Supplies:

You can purchase a few yards of Steam-a-Seam II Lite at a time from a quilt shop or order an entire box online. The amount you will need depends on how efficient you are when cutting your applique pieces.
Price - $70.54

Buy 7 yards at Joann Fabrics with a 40% off coupon.

Ann Silva's Sewing Center carries this product. Quilts Ole does not.
Neutral-Color King Tut Thread 500 Yards for the bobbin.
You can find this at quilt shops or Kmart online.
Superior King Tut Variegated Green Thread 500 Yards
You can find this at K-Mart online.

Price: $9.99

Price: $38.89

Price: $11.99

Price: $17.20

Price: $16.87

Price: $17.20

Price: $17. 94 with coupon code CFT42

Price: $23.38

Price: $9.99

Freezer Paper (Buy at local grocery store.)

Parchement Paper (Buy at local grocery store or hobby store with coupon.)
Price: $2.09 after 40% off coupon

Dynaflow (Brown)

Price: $2.69 when bought in store with 40% off coupon

Price: $29.24 or buy during 50% off sale at Joann Fabrics

Price: $9.06 or with 40% off at Joann Fabrics

Price: $5.64 for three
Price: $19.49